

RelativeLayout 又称相对布局。从名称上可以看出,这种布局方式是以一种让组件以相对于容器或者相对于容器中的另一个组件的相对位置进行放置的布局方式。RelativeLayout ……
RelativeLayout 又称相对布局。从名称上可以看出,这种布局方式是以一种让组件以相对于容器或者相对于容器中的另一个组件的相对位置进行放置的布局方式。
RelativeLayout 布局提供了一些常用的布局设置属性用于确定组件在视图中的相对位置。下面列举了 RelativeLayout 相关属性及其所代表的含义。
RelativeLayout 布局常用属性
| 属性 | 描述 |
|---|---|
| android:layout_above="@id/xxx" | 将控件置于给定 ID 控件之上 |
| android:layout_below="@id/xxx" | 将控件置于给定 ID 控件之下 |
| android:layout_toLeftOf="@id/xxx" | 将控件的右边缘和给定 ID 控件的左边缘对齐 |
| android:layout_toRightOf="@id/xxx" | 将控件的左边缘和给定 ID 控件的右边缘对齐 |
| android:layout_alignBaseline="@id/xxx" | 将控件的 baseline 与给定 ID 的 baseline 对齐 |
| android:layout_alignTop="@id/xxx" | 将控件的上边缘和给定 ID 控件的上边缘对齐 |
| android:layout_alignBottom="@id/xxx" | 将控件的底边缘和给定 ID 控件的底边缘对齐 |
| android:layout_alignLeft="@id/xxx" | 将控件的左边缘和给定 ID 控件的左边缘对齐 |
| android:layout_alignRight="@id/xxx" | 将控件的右边缘和给定 ID 控件的右边缘对齐 |
| android:layout_alignParentLeft="true" | 将控件的左边缘和父控件的左边缘对齐 |
| android:layout_alignParentTop="true" | 将控件的上边缘和父控件的上边缘对齐 |
| android:layout_alignParentRight="true" | 将控件的右边缘和父控件的右边缘对齐 |
| android:layout_alignParentBottom="true" | 将控件的底边缘和父控件的底边缘对齐 |
| android:layout_centerInParent="true" | 将控件置于父控件的中心位置 |
| android:layout_centerHorizontal="true" | 将控件置于水平方向的中心位置 |
| android:layout_centerVertical="true" | 将控件置于垂直方向的中心位置 |
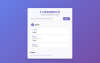
实例 RelativeLayoutDemo 演示了相对布局的使用方法,其运行效果如图 5 所示。
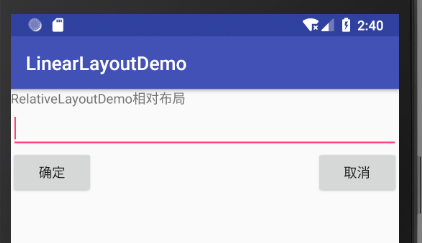
图 5 RelativeLayout 布局效果
实例 RelativeLayoutDemo 中的布局文件 main.xml 代码如下:
-
<?xml version="1.0" encoding="utf-8"?>
-
<RelativeLayout xmlns:android="http://schemas.android.com/apk/res/android"
-
android:layout_width="fill_parent"
-
android:layout_height="fill_parent">
-
<TextView
-
android:id="@+id/label"
-
android:layout_width="fill_parent"
-
android:layout_height="wrap_content"
-
android:text="@string/hello" />
-
<EditText
-
android:id="@+id/enter"
-
android:layout_width="fill_parent"
-
android:layout_height="wrap_content"
-
android:layout_alignParentLeft="true"
-
android:layout_below="@+id/label" />
-
<Button
-
android:id="@+id/button1"
-
android:layout_width="wrap_content"
-
android:layout_height="wrap_content"
-
android:layout_alignParentRight="true"
-
android:layout_below="@+id/enter"
-
android:text="@string/butltext" />
-
<Button
-
android:id="@+id/ok"
-
android:layout_width="wrap_content"
-
android:layout_height="wrap_content"
-
android:layout_alignBottom="@+id/button1"
-
android:layout_alignParentLeft="true"
-
android:text="@string/but2text" />
-
</RelativeLayout>
该 RelativeLayout 布局的过程如下:
1)放置一个 ID 为 label 的 TextView 组件。
2)通过 android:layout_below="@+id/label" 属性将 ID 为 enter 的组件 EditText 放置到 TextView 的下面。
3)在布局中加入一个 ID 为 button1 的 Button,通过 android:layout_below="@+id/enter" 属性将该 Button 放置到 enter 的下面,通过 android:layout_alignParentRight= "true" 属性将 Button 放置到相对布局的右侧。
4)在相对布局中加入一个名为 ok 的 Button,通过 android:layout_alignBottom="@+ id/button1" 属性将该 Button 底边与 button1 对齐,通过 android:layout_alignParentLeft ="true" 属性将该 Button 放置到布局的左边。


还没有评论呢,快来抢沙发~