在科技迅猛进步的今天,人脸识别技术的进步引起了广泛关注。人们不禁要问,这种技术究竟是如何运用图像处理和机器学习的方法来实现的?这其中涉及了许多有趣的过程和不少技术难题。
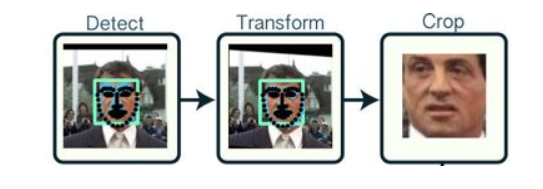
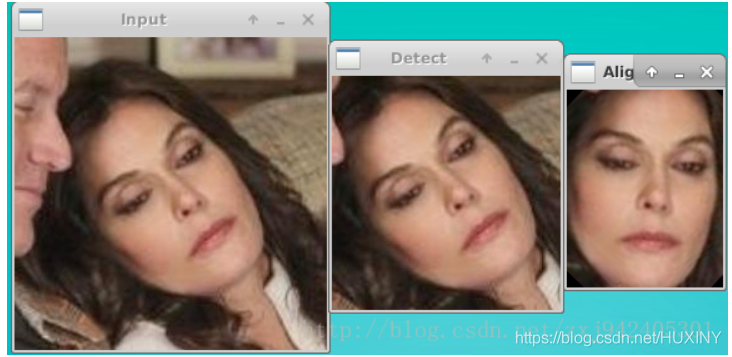
人脸检测是识别技术的先锋。它通过算法来精确识别图像中人脸的尺寸与位置,这一步骤至关重要。在城市监控等安防场景中,例如遍布街头的监控摄像头,必须准确进行人脸检测。其目的是从纷繁复杂的图像中提取出人脸区域。例如,大型商场的监控系统中就常应用这一技术。它是后续特征分析和识别工作的基础,没有精准的检测,后续的工作将难以顺利进行。此外,它在各种环境下都面临着严峻的挑战。在光线昏暗或人潮拥挤的环境中,人脸检测的准确性更是难以保证。
在不太理想的环境中,传统的人脸识别技术可能会出现漏检或误检。比如,一些早期的门禁系统使用的技术较为老旧,帽子或眼镜等简单的遮挡就能导致识别失败。
姿态与表情问题
在人脸识别技术中,同一个人在不同图片上展现的姿态和表情差异构成了一个难题。举例来说,人们在拍照时常常摆出各种表情,有的表情十分夸张,有的拍摄角度颇为独特。这些因素会导致面部肌肉和五官的相对位置发生显著变化。以机场的智能识别通道为例,旅客在通过时可能会有多种行走姿势和表情。这就需要人脸识别系统能够精确地识别出即使表情和姿态不同,但实质上是同一个人的情况。而且,当这些图像被用于识别目的时,如何有效消除因姿态和表情变化引起的干扰,是一项相当复杂的挑战。
在这种情况下,人脸图像的特征可能发生了显著变化,与既定模板相比,差异显著。对此,传统技术显得处理起来力不从心。
特征向量的形成
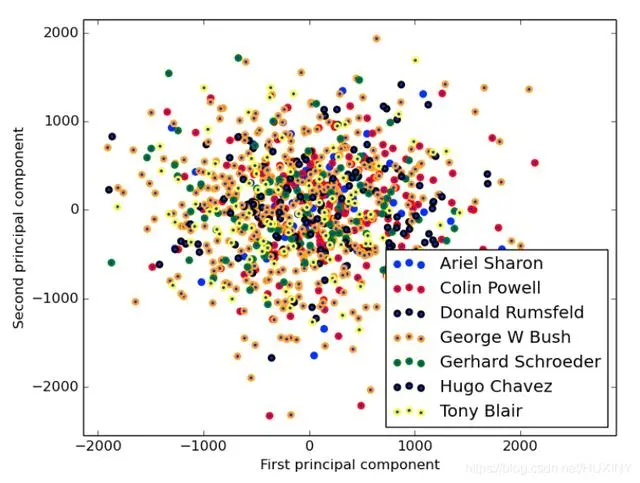
接下来,我们关注特征向量。通过将对齐后的人脸图像转化为特征向量,我们能够有效地描述人脸。然而,人脸照片的像素数量庞大,若以单个像素作为一维特征,那么特征向量的维度将会非常高,这无疑增加了计算的复杂性和耗时。以高分辨率的人脸图像为例,其像素众多,若全部用于构建特征向量,数据量将极为庞大。因此,我们需要类似PCA这样的技术。在人脸识别的实际应用中,通过应用PCA技术进行降维,计算时间和资源需求显著减少,同时保留了数据集的核心特征。PCA通过保留对数据方差贡献最大的特征,简化了数据集,为后续的识别任务提供了更易于处理的数据。
#coding:utf-8
from numpy import *
from numpy import linalg as la
import cv2
import os

def loadImageSet(add):
    FaceMat = mat(zeros((15,98*116)))
    j =0
    for i in os.listdir(add):
        if i.split(\'.\')[1] == \'normal\':
            try:
                img = cv2.imread(add+i,0)
            except:
                print \'load %s failed\'%i
            FaceMat[j,:] = mat(img).flatten()
            j += 1
    return FaceMat

def ReconginitionVector(selecthr = 0.8):
    # step1: load the face image data ,get the matrix consists of all image
    FaceMat = loadImageSet(\'D:python/face recongnitionYALEYALEunpadded/\').T
    # step2: average the FaceMat
    avgImg = mean(FaceMat,1)
    # step3: calculate the difference of avgimg and all image data(FaceMat)
    diffTrain = FaceMat-avgImg
    #step4: calculate eigenvector of covariance matrix (because covariance matrix will cause memory error)
    eigvals,eigVects = linalg.eig(mat(diffTrain.T*diffTrain))
    eigSortIndex = argsort(-eigvals)
    for i in xrange(shape(FaceMat)[1]):
        if (eigvals[eigSortIndex[:i]]/eigvals.sum()).sum() >= selecthr:
            eigSortIndex = eigSortIndex[:i]
            break
    covVects = diffTrain * eigVects[:,eigSortIndex] # covVects is the eigenvector of covariance matrix
    # avgImg 是均值图像,covVects是协方差矩阵的特征向量,diffTrain是偏差矩阵
    return avgImg,covVects,diffTrain

def judgeFace(judgeImg,FaceVector,avgImg,diffTrain):
    diff = judgeImg.T - avgImg
    weiVec = FaceVector.T* diff
    res = 0
    resVal = inf
    for i in range(15):
        TrainVec = FaceVector.T*diffTrain[:,i]
        if  (array(weiVec-TrainVec)**2).sum() < resVal:
            res =  i
            resVal = (array(weiVec-TrainVec)**2).sum()
    return res+1

if __name__ == \'__main__\':

    avgImg,FaceVector,diffTrain = ReconginitionVector(selecthr = 0.9)
    nameList = [\'01\',\'02\',\'03\',\'04\',\'05\',\'06\',\'07\',\'08\',\'09\',\'10\',\'11\',\'12\',\'13\',\'14\',\'15\']
    characteristic = [\'centerlight\',\'glasses\',\'happy\',\'leftlight\',\'noglasses\',\'rightlight\',\'sad\',\'sleepy\',\'surprised\',\'wink\']

    for c in characteristic:

        count = 0
        for i in range(len(nameList)):

            # 这里的loadname就是我们要识别的未知人脸图,我们通过15张未知人脸找出的对应训练人脸进行对比来求出正确率
            loadname = \'D:python/face recongnitionYALEYALEunpaddedsubject\'+nameList[i]+\'.\'+c+\'.pgm\'
            judgeImg = cv2.imread(loadname,0)
            if judgeFace(mat(judgeImg).flatten(),FaceVector,avgImg,diffTrain) == int(nameList[i]):
                count += 1
        print \'accuracy of %s is %f\'%(c, float(count)/len(nameList))  # 求出正确率
选择保留哪些特征并非固定不变,面对不同的人脸数据类型和识别目标,可能需要采取不同的策略。
降维处理
人脸识别中,PCA技术用于降低数据维度是关键步骤。这一过程在计算上能显著提高效率。若不进行降维,处理庞大的人脸数据库对硬件的要求就很高。比如,那些需要迅速处理大量人脸图像的安防机构,每秒钟就要处理大量图像。此外,降维还能凸显人脸的关键特征。在身份验证系统里,经过降维提取的主要特征就能准确识别身份。但过度降维也可能导致问题,可能会丢失一些重要的人脸细节,进而影响识别的精确度。
from __future__ import print_function

from time import time
import logging
import matplotlib.pyplot as plt

from sklearn.cross_validation import train_test_split
from sklearn.datasets import fetch_lfw_people
from sklearn.grid_search import GridSearchCV
from sklearn.metrics import classification_report
from sklearn.metrics import confusion_matrix
from sklearn.decomposition import RandomizedPCA
from sklearn.svm import SVC


print(__doc__)

# Display progress logs on stdout
logging.basicConfig(level=logging.INFO, format=\'%(asctime)s %(message)s\')


###############################################################################
# Download the data, if not already on disk and load it as numpy arrays

lfw_people = fetch_lfw_people(min_faces_per_person=70, resize=0.4)

# introspect the images arrays to find the shapes (for plotting)
n_samples, h, w = lfw_people.images.shape

# for machine learning we use the 2 data directly (as relative pixel
# positions info is ignored by this model)
X = lfw_people.data
n_features = X.shape[1]

# the label to predict is the id of the person
y = lfw_people.target
target_names = lfw_people.target_names
n_classes = target_names.shape[0]

print(\"Total dataset size:\")
print(\"n_samples: %d\" % n_samples)
print(\"n_features: %d\" % n_features)
print(\"n_classes: %d\" % n_classes)


###############################################################################
# Split into a training set and a test set using a stratified k fold

# split into a training and testing set
X_train, X_test, y_train, y_test = train_test_split(
    X, y, test_size=0.25, random_state=42)


###############################################################################
# Compute a PCA (eigenfaces) on the face dataset (treated as unlabeled
# dataset): unsupervised feature extraction / dimensionality reduction
n_components = 80

print(\"Extracting the top %d eigenfaces from %d faces\"
      % (n_components, X_train.shape[0]))
t0 = time()
pca = RandomizedPCA(n_components=n_components, whiten=True).fit(X_train)
print(\"done in %0.3fs\" % (time() - t0))

eigenfaces = pca.components_.reshape((n_components, h, w))

print(\"Projecting the input data on the eigenfaces orthonormal basis\")
t0 = time()
X_train_pca = pca.transform(X_train)
X_test_pca = pca.transform(X_test)
print(\"done in %0.3fs\" % (time() - t0))


###############################################################################
# Train a SVM classification model

print(\"Fitting the classifier to the training set\")
t0 = time()
param_grid = {\'C\': [1,10, 100, 500, 1e3, 5e3, 1e4, 5e4, 1e5],
              \'gamma\': [0.0001, 0.0005, 0.001, 0.005, 0.01, 0.1], }
clf = GridSearchCV(SVC(kernel=\'rbf\', class_weight=\'balanced\'), param_grid)
clf = clf.fit(X_train_pca, y_train)
print(\"done in %0.3fs\" % (time() - t0))
print(\"Best estimator found by grid search:\")
print(clf.best_estimator_)

print(clf.best_estimator_.n_support_)
###############################################################################
# Quantitative evaluation of the model quality on the test set

print(\"Predicting people\'s names on the test set\")
t0 = time()
y_pred = clf.predict(X_test_pca)
print(\"done in %0.3fs\" % (time() - t0))

print(classification_report(y_test, y_pred, target_names=target_names))
print(confusion_matrix(y_test, y_pred, labels=range(n_classes)))


###############################################################################
# Qualitative evaluation of the predictions using matplotlib

def plot_gallery(images, titles, h, w, n_row=3, n_col=4):
    \"\"\"Helper function to plot a gallery of portraits\"\"\"
    plt.figure(figsize=(1.8 * n_col, 2.4 * n_row))
    plt.subplots_adjust(bottom=0, left=.01, right=.99, top=.90, hspace=.35)
    for i in range(n_row * n_col):
        plt.subplot(n_row, n_col, i + 1)
        # Show the feature face
        plt.imshow(images[i].reshape((h, w)), cmap=plt.cm.gray)
        plt.title(titles[i], size=12)
        plt.xticks(())
        plt.yticks(())


# plot the result of the prediction on a portion of the test set

def title(y_pred, y_test, target_names, i):
    pred_name = target_names[y_pred[i]].rsplit(\' \', 1)[-1]
    true_name = target_names[y_test[i]].rsplit(\' \', 1)[-1]
    return \'predicted: %sntrue:      %s\' % (pred_name, true_name)

prediction_titles = [title(y_pred, y_test, target_names, i)
                     for i in range(y_pred.shape[0])]

plot_gallery(X_test, prediction_titles, h, w)

# plot the gallery of the most significative eigenfaces

eigenface_titles = [\"eigenface %d\" % i for i in range(eigenfaces.shape[0])]
plot_gallery(eigenfaces, eigenface_titles, h, w)

plt.show()
降维的程度需视具体应用场景而定,同时也要考虑人脸数据的品质。
人脸识别分类
人脸识别技术中,对特征向量进行分类是至关重要的步骤。我们采用多种分类算法来对特征向量进行判断。在一般的门禁系统中,相对简单的分类算法就能满足基本需求。然而,不同算法各有千秋。比如,某些算法在处理少量人脸数据时表现更佳,而另一些算法则在大规模数据集上更胜一筹。与机器学习模型的人脸识别不同,深度学习技术将人脸特征向量和分类过程合并,实现了一步到位。如今,一些高端企业级门禁和安防设备开始应用深度学习技术,显著提升了识别效率和准确度。
然而,在这一过程中,算法的挑选和参数的调整同样至关重要,且颇具挑战。
深度学习在人脸识别中的应用
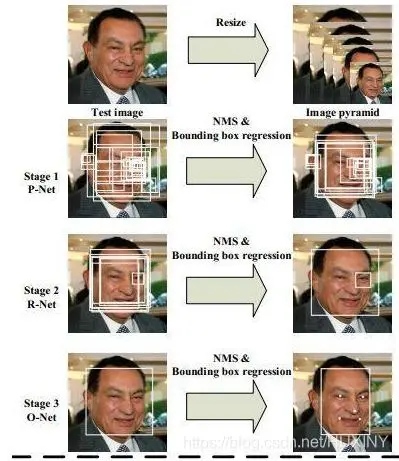
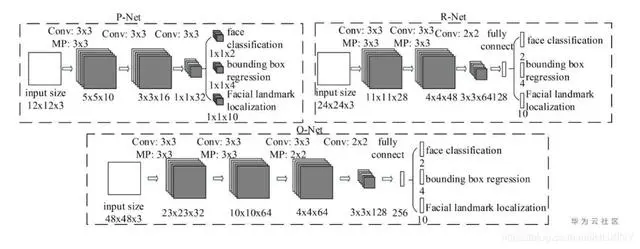
图像分类领域成功应用深度学习技术后,人脸检测领域也迅速采纳了这一技术。起初,人们利用CNN网络的不变性来处理图片缩放,进而进行推理。在智能安防摄像头等实际应用中,这种技术能够应对不同拍摄距离的人脸检测需求。特别是MTCNN这类多阶段分类器方法,在人脸检测上表现更为精确。MTCNN的PNet、RNet和ONet三部分各司其职。在诸如高风险安防场所管控系统等实际人脸识别任务中,它能够更精确地识别个体。此外,通过优化loss函数,我们既扩大了类别间的距离,又缩小了类别内的距离,从而提高了识别的准确性。然而,深度学习模型在数据需求和计算资源方面的问题仍需解决。
我想请教大家,您觉得是传统的人脸识别技术还是深度学习的人脸识别技术,将来会在我们的日常生活中更加普遍地被使用?期待大家的点赞、转发和留言。


