前言
在Vue中,this.$emit()方法用于触发自定义事件。它是Vue实例的一个方法,可以在组件内部使用。
使用this.$emit()方法,你可以向父组件发送自定义事件,并传递数据给父组件。父组件可以通过监听这个自定义事件来执行相应的逻辑。
下面是一个简单的示例,展示了如何在Vue组件中使用this.$emit()方法:项目文件夹下该组件定义路径 E:\\myproject\\src\\components\\ChildComponent\\index.vue
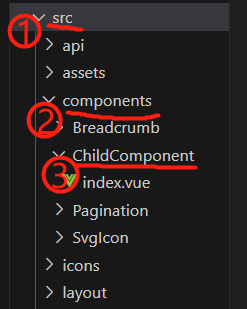
子组件 index.vue
|
1 2 3 4 5 6 7 8 9 10 11 12 13 14 |
<template> <button@click=\”handleButtonClick\”>点击触发事件</button> </template> <script> export default { name:\’ChildComponent\’, methods: { handleButtonClick() { // 触发自定义事件,并传递数据给父组件 this.$emit(\’custom-event\’, \’Hello, World!\’); } } } </script> |
在上面的示例中,当按钮被点击时,handleButtonClick方法会被调用。在该方法中,我们使用this.$emit()方法触发了一个名为custom-event的自定义事件,并传递了字符串’Hello, World!\’作为数据。
父组件可以通过监听custom-event来接收这个自定义事件,并执行相应的逻辑。例如,在父组件中可以这样监听并处理这个事件:
父组件 table.vue
|
1 2 3 4 5 6 7 8 9 10 11 12 13 14 15 16 17 18 19 20 21 22 23 24 25 26 27 28 29 30 31 32 33 |
<template> <el-row> <el-col:span=\”24\”> <el-card> <el-table…> … </el-table> </el-card> </el-col> <el-row> <div> <child-component@custom-event=\”handleCustomEvent\”></child-component> </div> </template> // 在父组件中导入子组件 import ChildComponent from \’@/components/ChildComponent\’ <script> export default { name: \’App\’, data() { return { } }, // 注册子组件 components: { ChildComponent }, methods: { handleCustomEvent(data) { // 处理自定义事件的逻辑 console.log(data); // 输出:\’Hello, World!\’ } } |
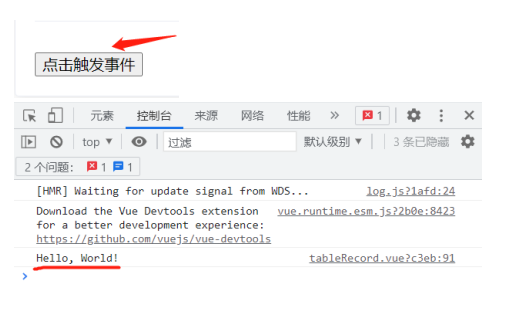
父组件通过@custom-event监听了custom-event自定义事件,并在handleCustomEvent方法中处理了这个事件。当子组件中的this.$emit(‘custom-event’, ‘Hello, World!’)被触发时,父组件的handleCustomEvent方法会被调用,并且传递的数据’Hello, World!\’会被打印出来。
注:
通过在components选项中注册子组件,可以在父组件的模板中使用该子组件。在这个例子中,父组件可以通过以下方式在模板中使用ChildComponent:
|
1 2 3 4 5 |
<template> <div> <child-component></child-component> </div> </template> |
子组件在模板中使用时需要使用短横线命名法(kebab-case),而在组件定义中使用驼峰命名法(camelCase)。你可以在components选项中注册多个子组件,并在父组件的模板中使用它们。这样可以实现更好的代码组织和复用。
这就是使用this.$emit()方法在Vue中触发自定义事件的基本用法。
总结
到此这篇关于Vue中的this.$emit()方法详解的文章就介绍到这了,更多相关Vue this.$emit()方法内容请搜索脚本之家以前的文章或继续浏览下面的相关文章希望大家以后多多支持脚本之家!


